
- Quick start
- Comparing different classifications
- Creating custom classification systems
- Adding tables to existing classifications
- Adding and editing classes and sub-classes
- Import and export of tables in Excel format
- Managing users and their rights
- Update user profile
- Extension for Autodesk® Revit®
- Extension for Autodesk® NavisWorks®
- Extension for TEKLA Structures
- Getting started with the BIMAXON ICS API
To begin, download the appropriate msi installation file:
BIMAXON ICS for Revit® 2023
BIMAXON ICS for Revit® 2022
BIMAXON ICS for Revit® 2021
BIMAXON ICS for Revit® 2020
BIMAXON ICS for Revit® 2019
BIMAXON ICS for Revit® 2018
Each supports the corresponding 32-bit and 64-bit versions of Autodesk® Revit® Suite and Autodesk® Revit® Architecture/Structure/MEP, on the MS Windows® 11, Windows® 10, MS Windows® 8.1, MS Windows® 8 or MS Windows® 7 operating systems. The language is English.
Double click on the installation file to start the setup process. Then just follow the instructions in the installation wizard to complete the installation.
After installation is complete, launch Revit and open any project.
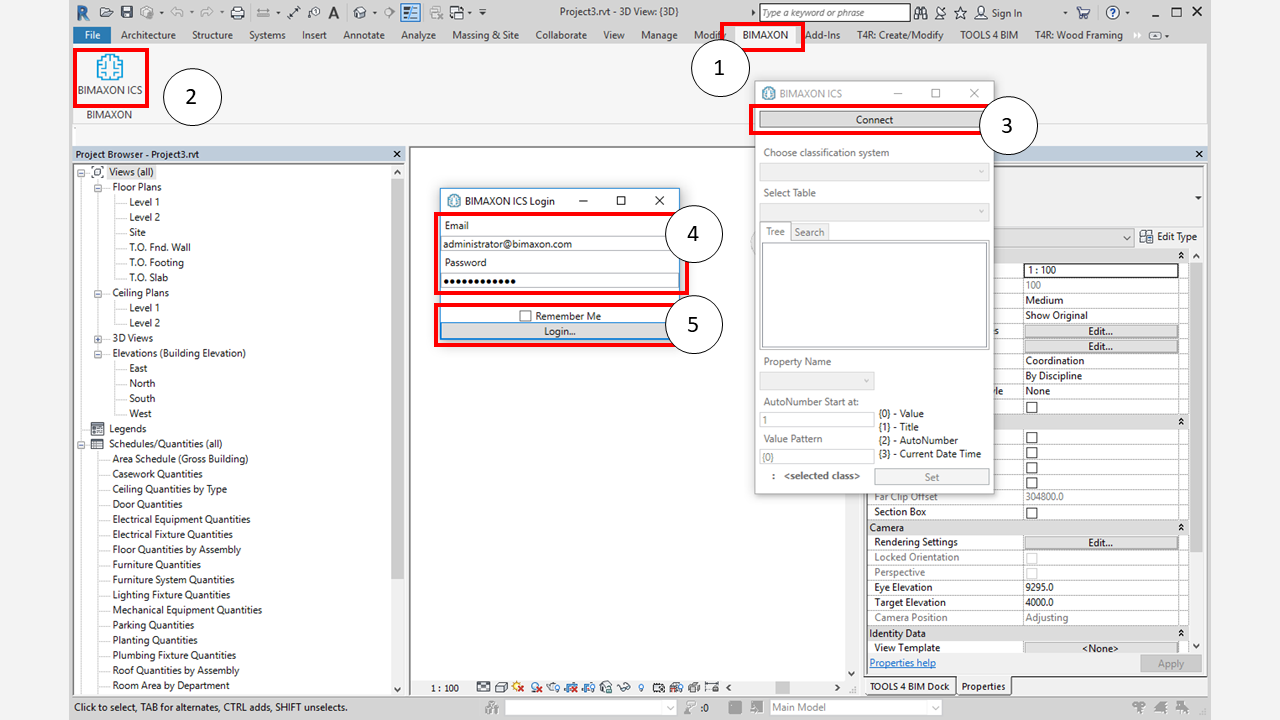
1. Open BIMAXON ICS. You’ll find it under the BIMAXON tab in Revit.
2. Click on the BIMAXON ICS icon to get started.
3. Connect to the ICS server.
4. Enter your login details.
5. Check “Remember me” if you wish, to store login details, and then click the login button.
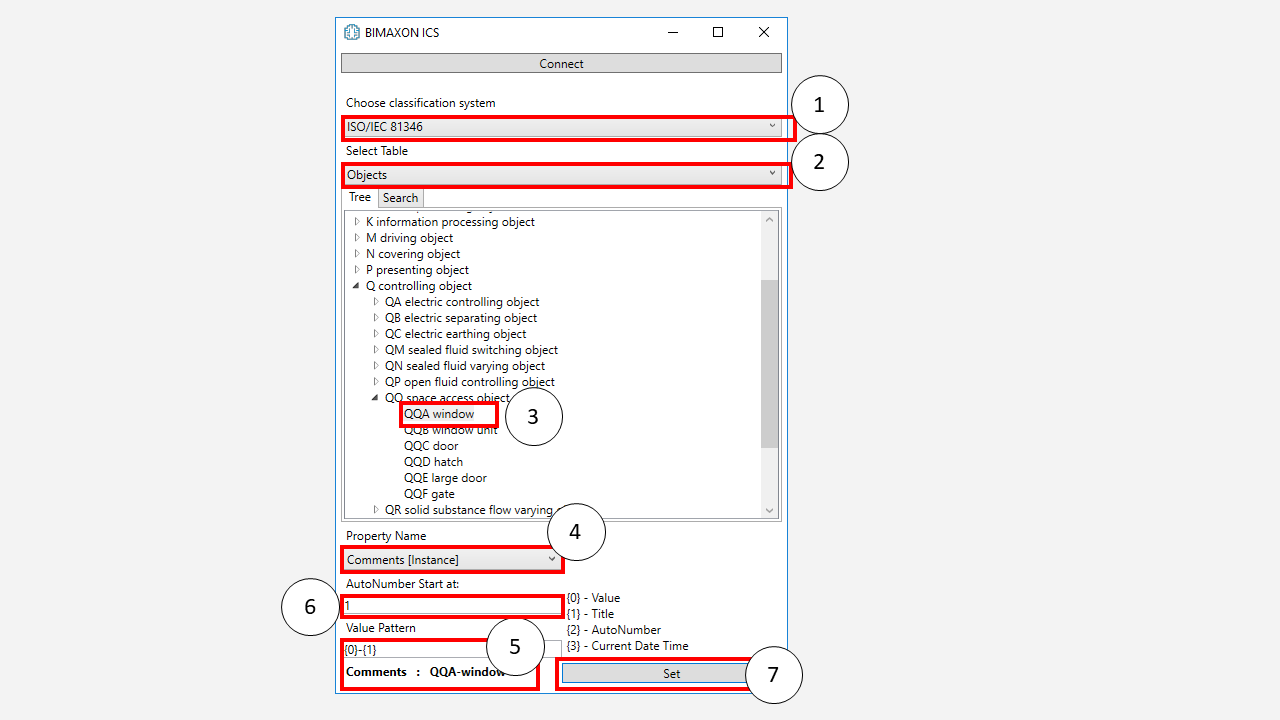
1. Choose a classification system from the drop-down list.
2. Then select a table in that classification system from the drop-down list
3. Browse the tree structure to find the class you are looking for and select it.
4. Choose a property name from drop-down list.
NOTE! Elements must be selected before accessing the drop-down list. The list of property names contains all the properties of the selected elements available for modification.
5. The Value text field allows you to create different types of property values.
6. Auto-numbering will start from the number entered in AutoNumber Start at: field.
7. Click the Set button to set the values for your selected elements.
There are four types of scripts – {0}, {1}, {2} and {3} – to help you create combined values. You can use scripts within any word combinations. Simply write {0} and a tool will add to your chosen property value the index value of only the class selected in the tree.
{0} – adds the index value of the class selected in the tree.
{1} – adds the name of the class selected in the tree.
{2} – adds a number to the last value. This lets you auto-number elements by increasing the previous number by +1.
{3} – adds the current date and time.
Some examples of how it works:
Script: {0} – Hello world
Result: 23-17 13 15 23 – Hello world
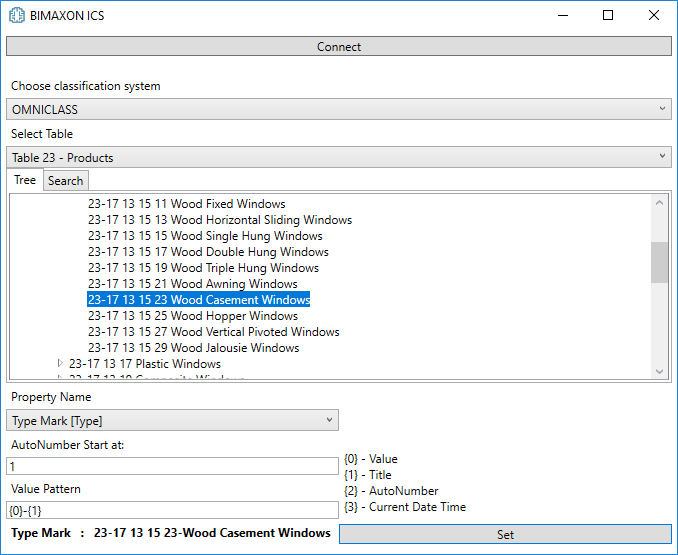
Script: {0}-{1}
Result: 23-17 13 15 23-Wood Casement Windows
Script: {1}
Result: Wood Casement Windows
Script: %%%{0}-{1}
Result: %%%23-17 13 15 23-Wood Casement Windows
Script: Hello{0}
Result: Hello23-17 13 15 23
Script: Hello{0}world
Result: Hello23-17 13 15 23world
Script: Hello {0} world
Result: Hello 23-17 13 15 23 world
To fix the number of digits in the numbering script {2}, specify the number of digits with a :, the letter D and the number.
Here is an example for auto-numbering with three digits.
Script: {2:D3}
Result: 001, 002, … , 010, 011, … , 100, 101, …
And here is an example for a class title and auto-numbering with two digits.
Script: {1}-{2:D2}
Result: Wood Casement Windows-01, Wood Casement Windows-02, … , Wood Casement Windows-10, Wood Casement Windows-11, … , Wood Casement Windows-99, Wood Casement Windows-100, Wood Casement Windows-101, …